
Menus
Overview
- The Main and Tile Menus in BOS Enterprise are fully customisable.
- The Main Menu should contain all the menu items used in the application and appears at the top of the application window.
- The Tile Menu should include frequently used items.
- Menu Templates are created and allocated to users.
- The Menu item in the Status Bar (bottom right-hand corner) is fixed. It includes features to test different screen sizes. You can also check the version that is installed by clicking About QuickEasy Software. It also has a link to open the DB Monitor.
Settings
User Settings
| Setting | Description | Default |
|---|---|---|
| Setups > Menu Manager > Access Allowed | Checkbox. If checked, access is allowed to the menu setups. | Unchecked |
| System > Hide Main Menu | Checkbox. If checked, the main menu is hidden (only the Tile menus appear). | Unchecked |
| System > Menu Template | A dropdown list of all the available Menu Templates. Use this setting to assign a Menu Template to a user. | Not set |
General Settings
The defaults are the values for new databases, new users and new Transaction Types. Your database may have different values.
| Setting | Description | Default |
|---|---|---|
| General > Disable Automatic Tile Menu updates | Checkbox. If checked, the text on the tile menus (transaction counts) is suppressed. To show the text, click the Menu icon (four-colour button on the top left). This setting is a backstop in case the tile menu refreshes slowly after an upgrade. Restart BOS Enterprise to apply changes to this setting. | Unchecked |
Menu Groups: List View
Use Menu Groups to group menu items (e.g. Transactions, Workflow, Accounting).
Buttons Explained
To edit a Menu Group, double-click the group name on the list of Menu Groups.
| Button | Description |
|---|---|
| New | Creates a Menu Group. |
Fields Explained
| Field | Description |
|---|---|
| Description | The name of the group. |
| Colour | The colour allocated to the group. |
| Items | The number of items in the group. |
| Menu (...) | Options to Edit or Delete the group. |
Menu Groups: Edit View
Fixed Groups (Home (First in Main Menu) Help, Refresh and Recent (Last in Main Menu) are automatically added.
Items are automatically added.
Groups can be reordered using drag-and-drop.
Buttons Explained
| Button | Description |
|---|---|
| Arrows | Scrolls between the Menu Groups. |
| Edit | Lets you edit the group. |
| New | Creates a Menu Group. |
| Save | Saves any changes. |
| Delete | Deletes the Menu Group if it is empty and not allocated to a template. |
| Menu | Layout |
| Close | Closes the Edit Menu Group popup. |
| Add Menu Items |
|
Fields Explained
Additional fields can be added using the Field Chooser (*).
| Field | Description |
|---|---|
| Caption | Enter the name of the group. |
| Colour | An option to select a colour for the group by clicking the arrow on the colour. Although any colour may be chosen, keep in mind the text on the tile menu is white. |
| Grid columns | The grid shows the selected items as follows:
|
Menu Templates: List View
Buttons Explained
To edit a Menu Templates, double-click the template name on the list of Menu Templates.
| Button | Description |
|---|---|
| New | Creates a Menu Template. |
| Menu |
|
Fields Explained
Additional fields can be added using the Field Chooser (*).
| Field | Description |
|---|---|
| Description | The name of the Menu Template. |
| Default | A checkbox. If checked, this template is the default template that is allocated to new users. |
| Items | The number of items included in the Menu Template. |
| Users | The number of users to whom the menu is allocated. |
| Menu (...) | Click the button or right-click a template for these options:
|
Menu Templates: Edit View
Buttons Explained
| Button | Description |
|---|---|
| Arrows | Scrolls between the Menu Templates. |
| Edit | Lets you edit the templates. |
| New | Creates a Menu Template. |
| Save | Saves any changes. |
| Delete | Deletes the Menu Template if it is empty and not allocated to a user. (If it contains items, edit the template, and delete all the items first.) |
| Menu | Layout |
| Close | Closes the Edit Menu Templates popup. |
| Custom Menu Group | Provides a dropdown list of all the created Menu Groups for you to select the Group to include. Only one group can be added per line. |
Fields Explained
Additional fields can be added using the Field Chooser (*).
Fields marked in blue (✎) can be edited.
| Field | Description |
|---|---|
| Menu Group | The name of the Menu Group. |
| Tile Menu | A checkbox. If checked, the Menu Group appears on the tile menu. Only the items for which the Tile Menu checkbox is checked on the Menu Group are included. |
| Begin Group | A checkbox. If checked, draws a line just above the item name to delineate it from the other items in the group. |
| Menu (...) | Options to rearrange the menu (entries can also be dragged and dropped):
|
Tile Menu: Additional Information
- The Tile Menu should display frequently used Menu Items.
- The number of items that can fit on the Tile Menu depends on the monitor size and resolution.
- Groups default to two columns, but up to six columns fit on a standard HD display (1920 x 1080).
- Four to eight rows are ideal for a standard HD display (1920 x 1080).
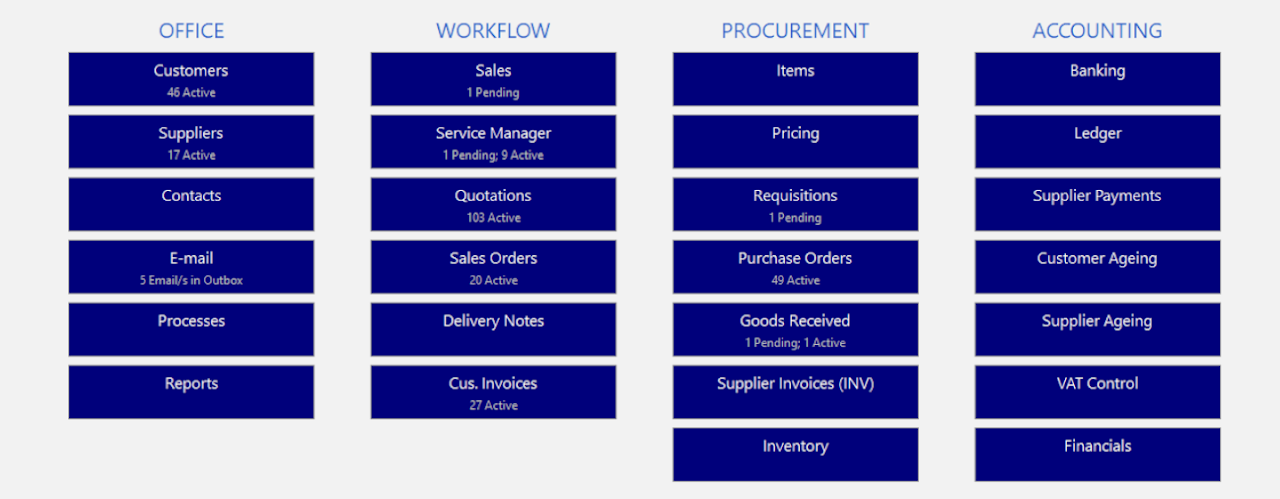
- The Tile Menu displays live Notes (transaction counts) for Transactions and certain Fixed Modules. See the example below.
Technical Information
Menu Groups
Use Menu Groups to group similar Menu Items. They appear on the Main Menu and on the Tile Menu.
- Main Menu Index: Indicates the order in which the Groups appear in the Main Menu. Assign -1 to hide the Menu Group on the Main Menu.
- Tile Index: Indicates the order in which the Groups appear in the Tile Menu. Assign -1 to hide the Menu Group on the Tile Menu.
Menu Items
Each Menu Group contains an ordered list of Items.
- Main Menu Index: Sets the order of the Items in the Main Menu Group. Assign -1 to hide an Item on the Main Menu.
- Tile Menu Index: Sets the order of the Items in the Tile Menu Group. Assign -1 to hide an Item on the Tile Menu.