
Layout
Overview
BOS Enterprise displays reports and transaction interfaces in a grid view. Various commands change these views to suit user preferences or display additional information.
Displays
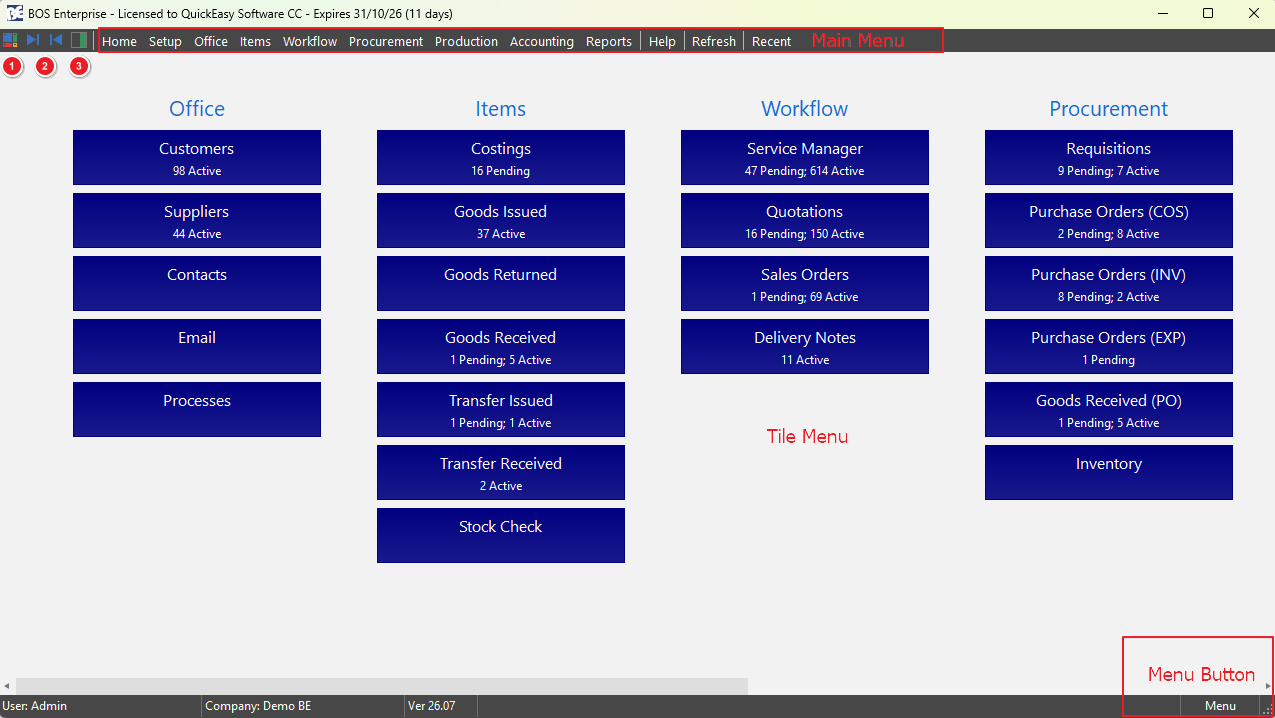
- Certain displays fill the screen, other displays open on the right, moving the existing display to the left.
- When you have two displays on screen you can adjust them as follows:
- Click and drag the three vertical dots on the panel in the centre of the two displays left or right to resize the displays.
- Use the Navigation Icons in the top left corner (see above screenshot):
- Four coloured squares: Displays the menu buttons. If two panels are open, the menu appears on the left and the panel on the right remains.
- Move to Right Panel (button): Moves the display on the left to the right. The contents on the right panel are replaced. Move to Left Panel (button): Moves the display on the right to the left. The contents on the left panel are replaced.
- Square with green panel on the right: Click the square to close the display on the right.
Grid Views
Grid views display data in a tabular form using columns (Fields) and rows (Records). The columns represent the various fields or attributes of the data, whereas the rows represent individual records or instances of the data. To show records in the grid, set a Data Filter and then click View (button).
Changing the Layout
The layout and appearance of the columns can be changed using the following options:
- Resizing: The column widths can be resized by dragging the separating line to the right of the column.
- Best Fit: The column can be automatically adjusted to fit the contents by right-clicking the column header and selecting Best Fit.
- Best Fit (All Columns): All the columns can be adjusted to fit the contents on the screen by right-clicking any column header and selecting Best Fit (All Columns).
- Re-Ordering: Columns can be moved to a new horizontal position by long-clicking the Column Header and dragging the header to a new location. The green up/down arrows pinpoint the new location.
- Ascending/Descending Order: You can show a column's contents in ascending or descending order. The order can be changed by clicking the Column Header.
- Removing a Column: Columns can be removed by right-clicking the Column Header and selecting Remove This Column. Columns can also be removed using the Field Chooser (*).
- Adding Columns: Columns can be added or removed using the Field Chooser (*) which is the first column in most views. Clicking the Field Chooser (*) displays a list of available columns. A checkmark indicates the column appears.
- Other options are:
- Click (All) to select all or none of the columns.
- Black Square: Some columns are selected.
- Checkmark: All the columns are selected.
- Blank: None of the columns are selected.
- Click (Sorted) to change the column display on the Field Chooser (*) only:
- Checkmark: The columns are listed alphabetically.
- Blank: The columns on the Field Chooser (*) match the layout of the columns on the screen.
- Click (All) to select all or none of the columns.
If the layout is not saved, the default layout appears again the next time the user accesses that screen.
Menu Layout & Grids
The Menu button on the top row in most views have layout options. These are variations of:
| Field | Description |
|---|---|
| Save | Once a layout is chosen as per the above instructions, you can save the layout for your future use. |
| Save (All Users) | Once a layout is chosen as per the above instructions, you can save the layout for all users. |
| Restore Default | Restores the default view for the user. |
| Restore Default (All Users) | This feature restores the layout to the default layout. A restart is required and you are prompted to restart when the setting is accessed. |
Grid Search
A Search Bar appears to the left of the workspace, directly above the grid.
- Enter a word or part of a word in the Search Bar and only the records that contain the word or phrase appear.
- Click the X in the small circle to clear the search filter.
Column Actions
Column Grouping
A context menu can be accessed by right-clicking the column header. This menu has two grouping options:
- Group by This Field
- Places the column that was right-clicked at the top.
- The fields in that column become headings with the entries collapsed below them:
- Click the arrow to expand the heading and view the entry.
- Additional columns can be dragged next to the heading to further nest the records.
- The grouping can be changed by long-clicking a heading and dragging it before or after another heading.
- Right-click the field that was opened and select Remove from Grouping to remove the column from grouping or drag the column back to the grid headings row.
- Group by Box
- Opens a field at the top for a column to be dragged onto it.
- The fields in that column become headings with the entries collapsed below them. Click the arrow to expand the heading and view the entry.
- Additional columns can be dragged next to the column heading to further nest the records.
- To undo the grouping:
- Right-click the field that was opened and select Remove from Grouping or right-click the space where you drag the headings and select Clear Grouping.
- Right-click the field header that was opened and select Group By Box again to deselect it.
Column Filtering
- To filter column information, click the small filter icon (funnel) on the right of a Column Header and select an option from the dropdown list.
- The dropdown list depends on the information in the column. For example, a Date column will include options to filter on relative date periods.
- Checkmarks: The content appears.
- When a column is filtered, the information appears in the bottom left of the screen. Click the red X on this display to clear the filter.
Column Alignment
- Fields in a column can be left or right-aligned or centred by right-clicking the Column Header, selecting Alignment and then one of these options:
- Align Left
- Align Right
- Align Center
Menu (button) bottom right
The menu button on the bottom bar of BOS Enterprise includes the following functions:
| Button | Description |
|---|---|
| Refresh | Refreshes any lookup lists. |
| Restart | Restarts BOS Enterprise. |
| Exit | Exits BOS Enterprise. |
| Setup Menu | Opens the Menu interface for editing. This menu refers to the top menu, the dropdown list on the top menu and the tile menus. |
| Enable DB Monitor | Enables the database monitor. |
| About QuickEasy Software |
|
| Window | Provides options to automatically resize BOS Enterprise.
|
| Layout |
|
Help Menu
- Help is a fixed menu item: add it to a Menu Group to show it (see Menus).
Help Menu Options Explained
| Option | Description |
|---|---|
| Request Helpdesk Support | Opens the QuickEasy support request page in your browser. |
| Online Documentation |
|
| Renew License | Opens the License Renewal window (see below). |
| Terms of Use | Opens the QuickEasy application terms of use in your browser. |
Help Settings
The defaults are the values for new databases, new users and new Transaction Types. Your database may have different values.
| Setting | Description | Default |
|---|---|---|
| General > Website link (URL) for Online Documentation | Enter the address of the documentation site, for example https://bosentdocs.vibecraftedsoftware.com. | Blank |
License Renewal Window
- QuickEasy gives you a new expiry date and key when your license is renewed.
- The window also opens by itself when the license has expired. Closing it then closes BOS Enterprise.
| Field | Description |
|---|---|
| Licensed to | The license holder. |
| License No | The license number. |
| License expires / License has expired | The current expiry date, or that the license has expired. |
| Expiry Date | Enter the new expiry date. |
| Key | Enter the key for the new expiry date. |
| Log | Shows the progress of the renewal. |
License Renewal Buttons Explained
| Button | Description |
|---|---|
| Renew | Checks the key and renews the license. The messages are:
|
| Close | Closes the window. If the license has expired, BOS Enterprise closes too. |